Sharing is caring!
Want to know how you can quickly develop one-to-one relationships with every customer and deliver exceptional service across multiple channels? This is where Salesforce Service comes out as an effective solution for businesses to scale & grow while building loyalty with every customer interaction. In short, it’s a comprehensive solution that works as a help desk and customer service platform.
Salesforce Service Cloud, a cloud-based customer service management solution, provides you with a 360-degree view of your customers and enables you to deliver personalized service on time, every time. With Service Cloud, you can automate service processes, streamline workflows, and surface critical articles, topics, and experts to transform the agent experience.
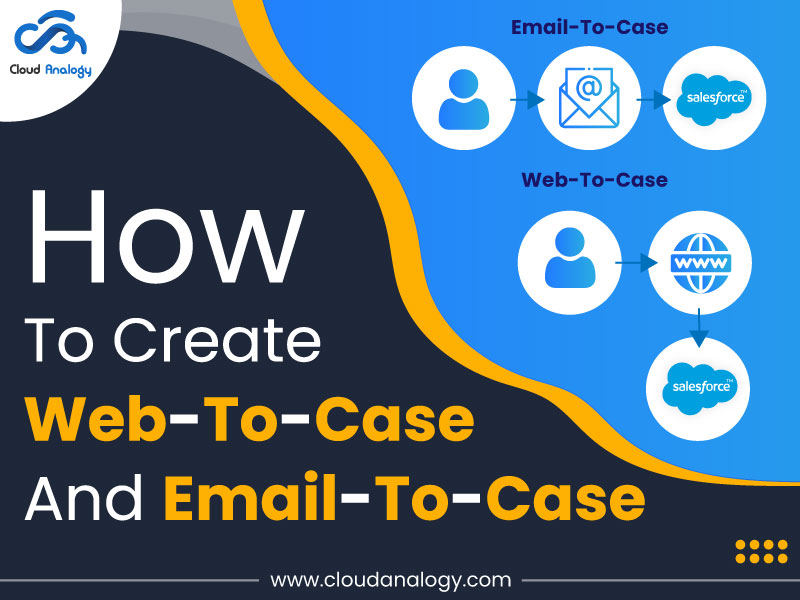
Salesforce Service Cloud unfolds two out-of-the-box features, including Web-to-Case and Email-to-Case, to transform customer service processes and ensure your service teams work more effectively than ever.
In this blog, we will discuss how to create Web-To-Case and Email-To-Case in Salesforce Service Cloud, but before getting started, let’s have a quick introduction to Web-to-Class and Email-to-Case in Salesforce and how they are useful.
Web-To-Case In Salesforce Service Cloud
Web-to-Case in Salesforce is an innovative feature that helps you gather customer support requests directly from your company’s website and automatically generate up to 5,000 new cases a day. This can help your organization respond to customers faster, improving your support team’s productivity.
It offers the ability to create a simple public case submission page on your website with your branding and styling. It works by generating a snippet of HTML. Users can categorize specific requests, assuming the customer fills out the relevant information. For example, they may include their contact name, email, phone, subject, or description. This method of data collection in Web-to-Case helps in email categorizing within Salesforce. The HTML form you create in Web-to-Case can be quickly published on your website.
Email-To-Case In Salesforce Service Cloud
Email-to-Case feature in Salesforce allows you to convert the emails received at your support email address into cases. You can then incorporate these emails-turned-cases in your organization’s customer support queue and follow a systematic approach to track & resolve them.
Email-to-Case saves your time by eliminating the need for users to create or update Salesforce cases manually. It removes some of the manual administration tasks required across your team by automatically creating cases using the relevant information in customers’ emails. When customers send you a query or question via email that defines that they’re “raising a case.” Email-to-Case ensures that the email is captured, an actual case created in Salesforce, and the relevant data in the email mapped to the appropriate fields on the new Salesforce record.
Email-To-Case Comes With Two Setup Options:
- Email-To-Case
- On-Demand Email-To-Case
Pre-Steps For Setting Up Web-To-Case
Before getting started with web-to-case, one should create an email template for the customer’s notification on submitting the case. Additionally, a Queue can be created for assigning cases directly to the users in the Queue.
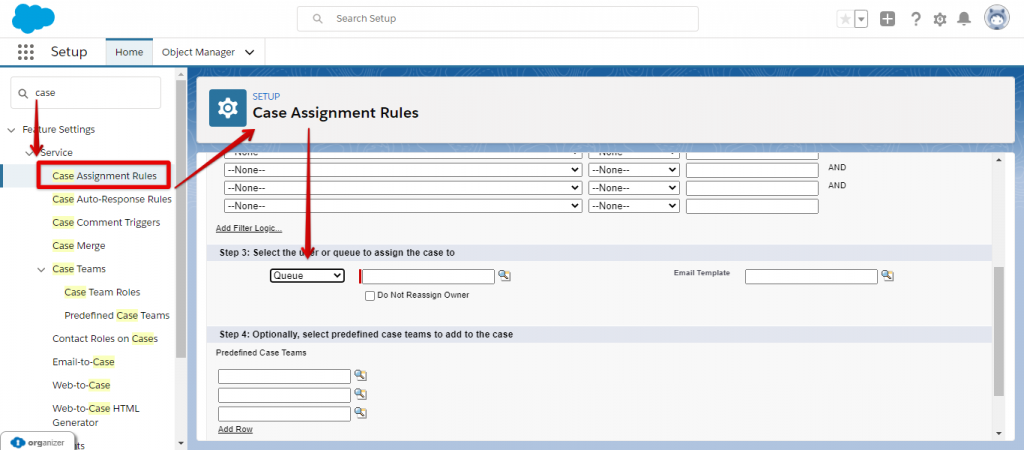
Note: Default owners from the Support Setting will be assigned to all web-generated cases if an active assignment rule is not set up correctly.
For example, whenever a user posts a case, some fields must be filled and will be stored in the Case created. Suppose the record filled in the required field and its email address matches with any Contact in your system; in that case, Web-To-Case will automatically associate that case with the contact including a matching email address and the account associated with the contact. If the email address is not found, or Web To Case discovers more than one contact with that email address, Web-To-Case couldn’t determine which contact to associate with the case. In that instance, it will leave the Contact and Account fields on the case blank and allow you to fill them that you can generally find using those Web Name and Web Email fields.
How To Set Up Web-To-Case:
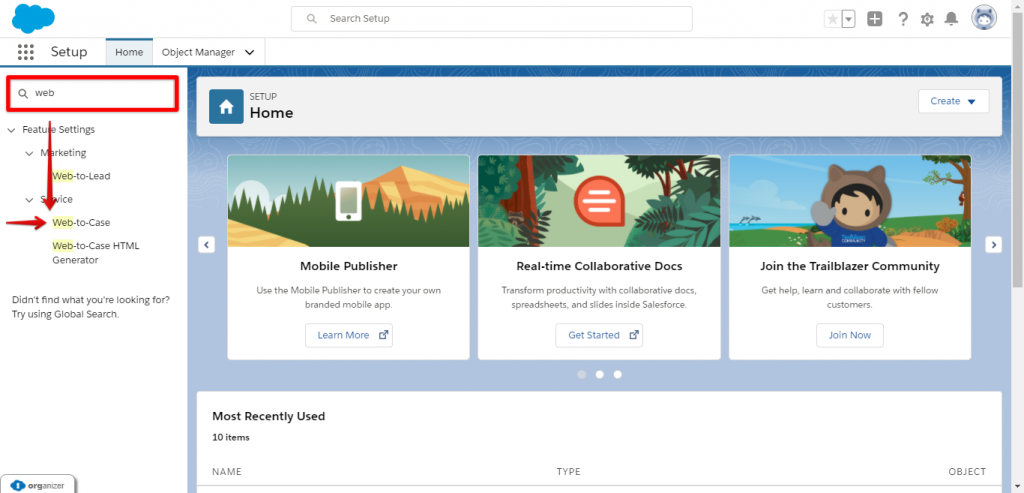
- Go to setup and write web-to-case in the Quick Find box.
- Click on Web to Case.
3. Select Enable Web to Case field and choose a Case of Origin from the drop-down menu(Email, Phone, or Web).
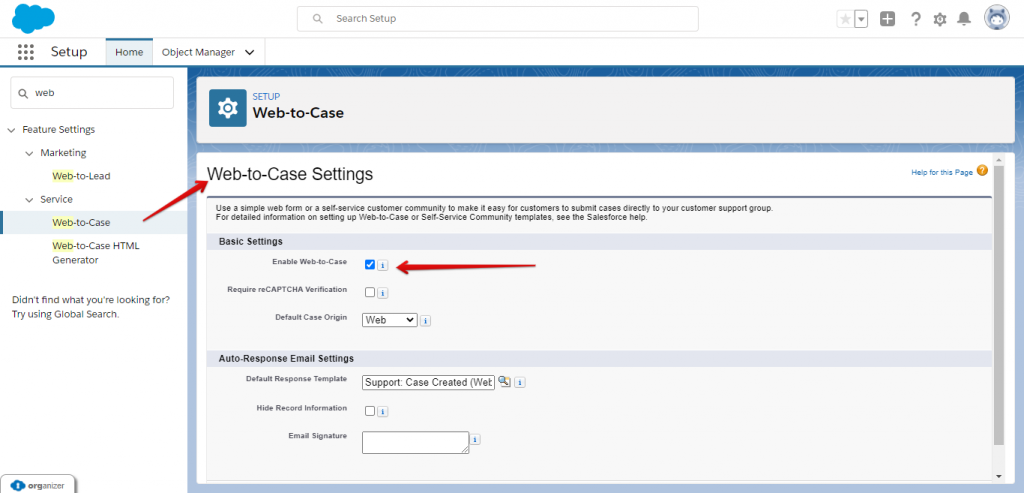
4. Select a default Response Template; one can set up response rules for using different email templates based on the information submitted; the default email template will be used only when no response rules are applied.
Note: Hide Record Information should be selected if one wants to hide the user’s email record information.
5. Provide an Email Signature if one wants to use another signature other than the default one.
6. Click on the Save button.
Steps To Generate Case From Web
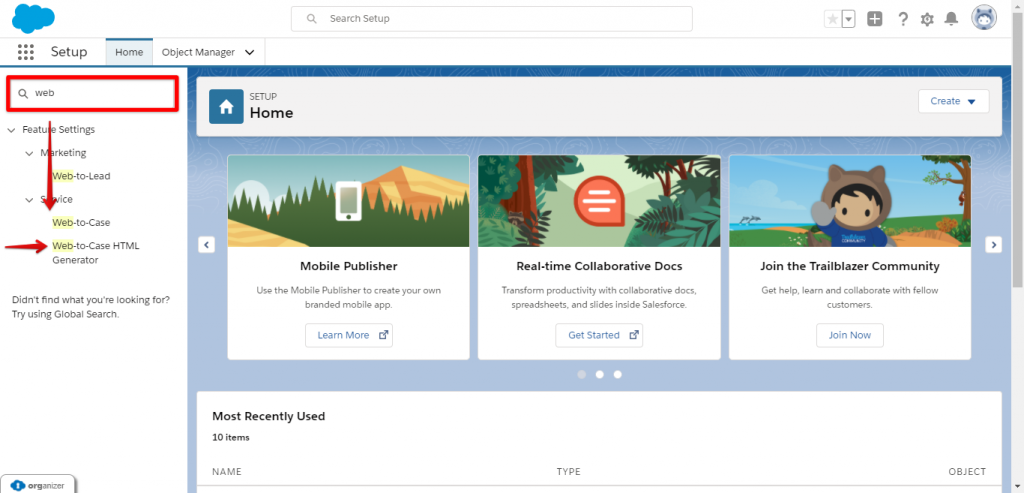
- To generate Web-to-Case, you need to type Web-to-Case in the Quick Find box.
- Click on Web-to-Case HTML Generator.
3. Select the fields that will be shown on the Web, i.e., Company, Subject, etc.
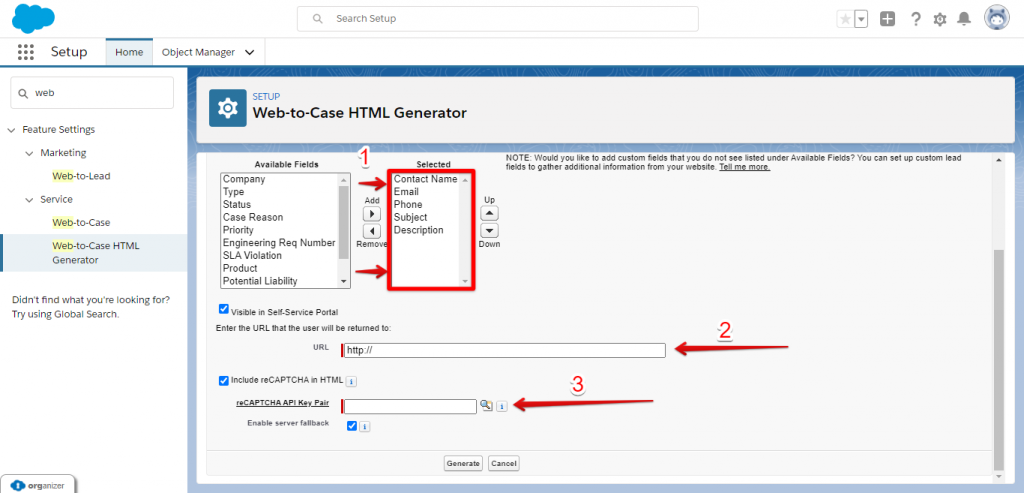
4. Select Visible in the Self-Service Portal checkbox to enter the URL to which the user will return.
5. To provide security, one can add reCAPTCHA to the HTML code.
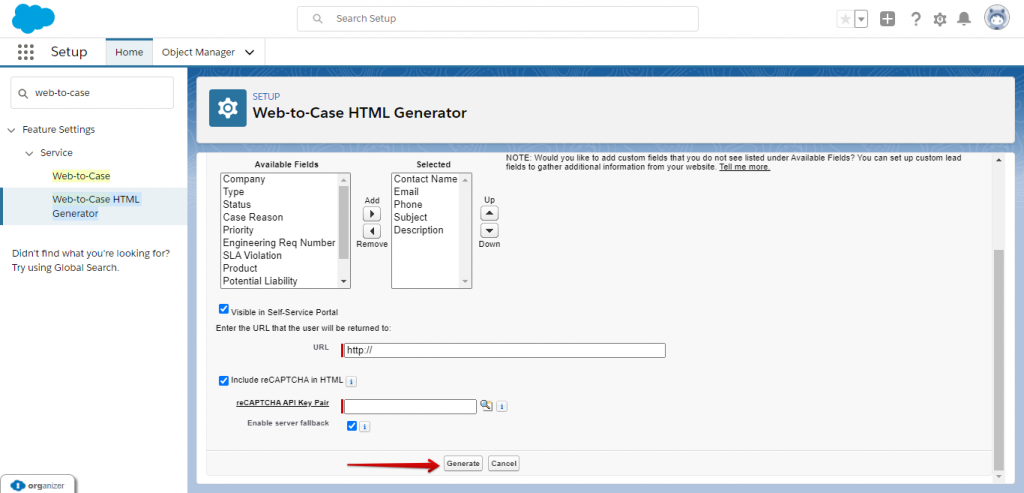
6. Click on the Generate button after every required field is selected, an HTML code will be generated for the selected field and org.
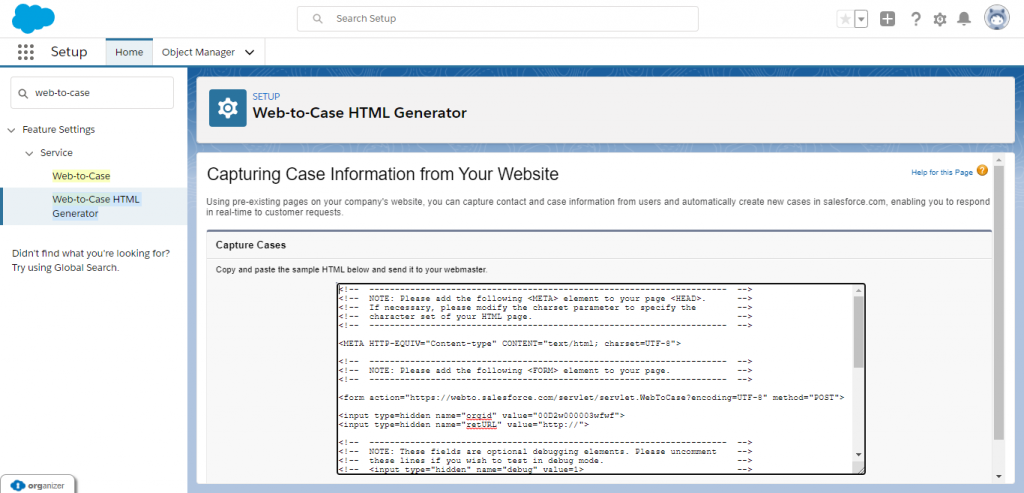
7. Copy the generated code into the notepad and save it in—HTML format.
8. Open the generated document in the browser and enter the records on the page.
How To Set Up Email-To-Case
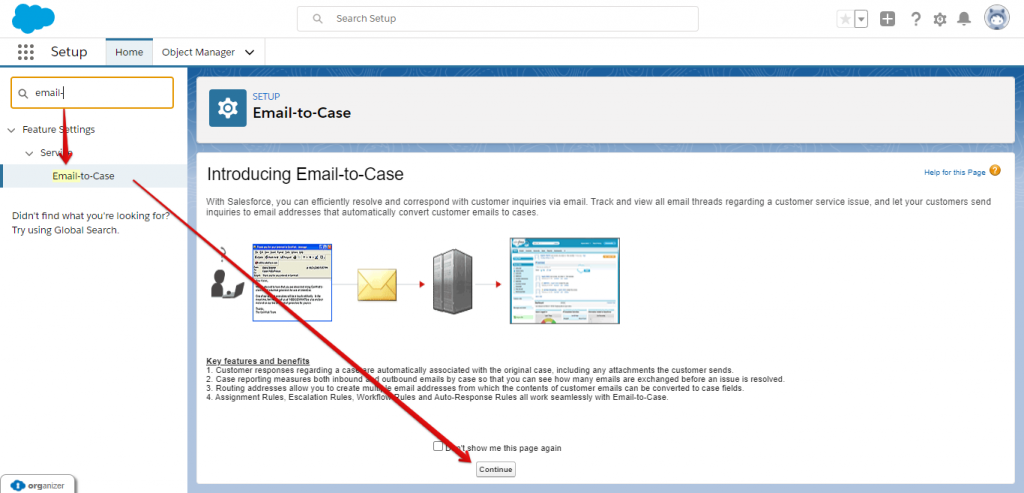
- Enter Email-to-case in the Quick Find box and click on Email to the case.
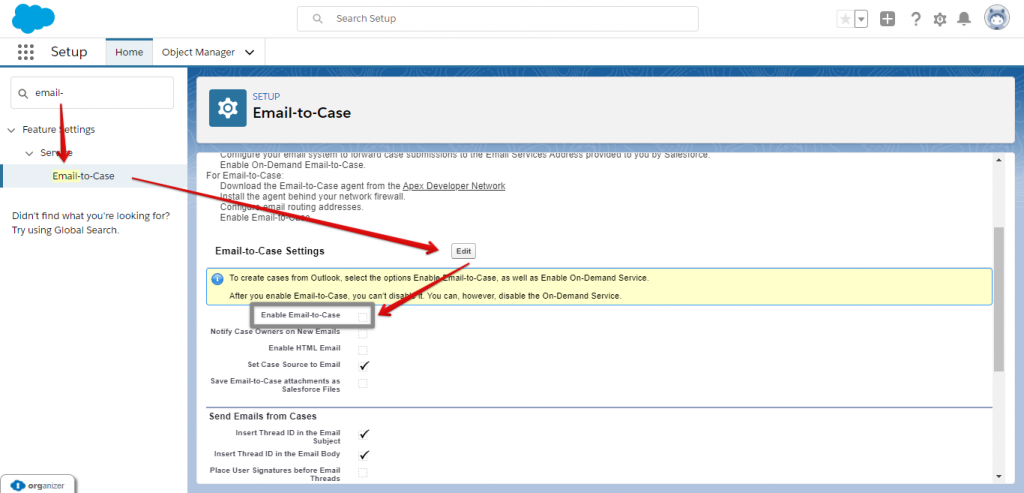
2. Enable Email-to-Case and other related options, i.e., the signature before Email threads ( Note -: Once the checkbox is enabled, it cannot be disabled after).
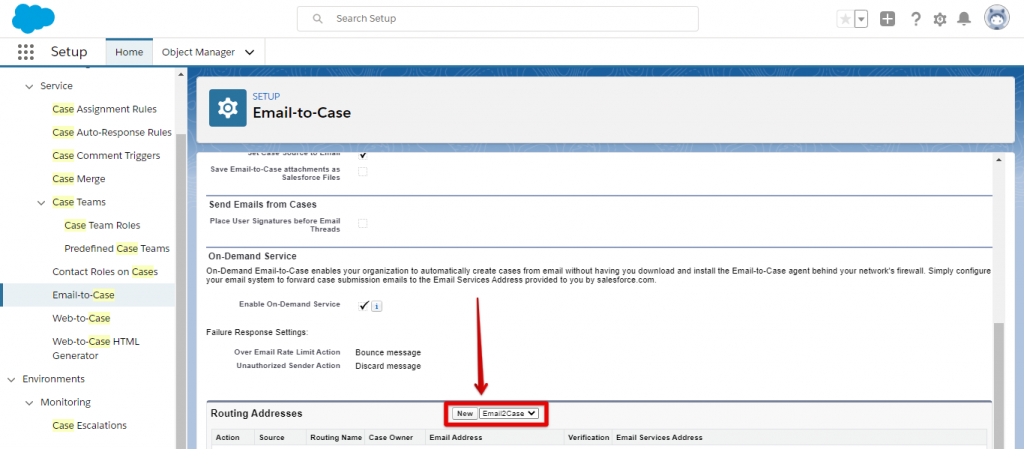
3. Configure your Routing Address, select Email2Case from the dropdown, and click on the New button.
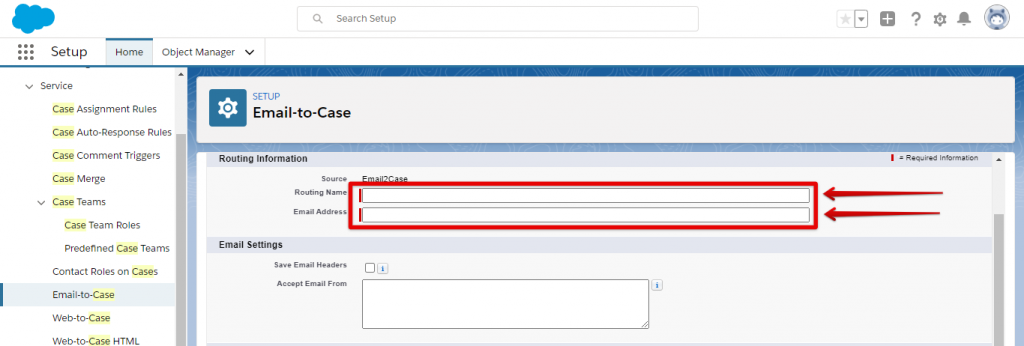
4. Provide a Routing Name and the Email Address, which will be used to create a case.
5. Determine the Task settings, Case Settings according to the requirement and click on the Save button.
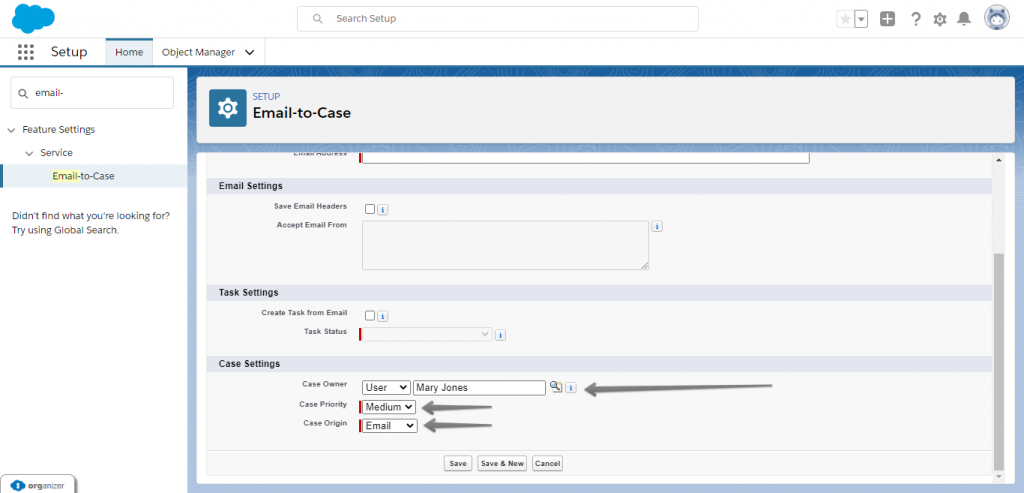
6. An Email will be sent to the given email address; click on the verify link.
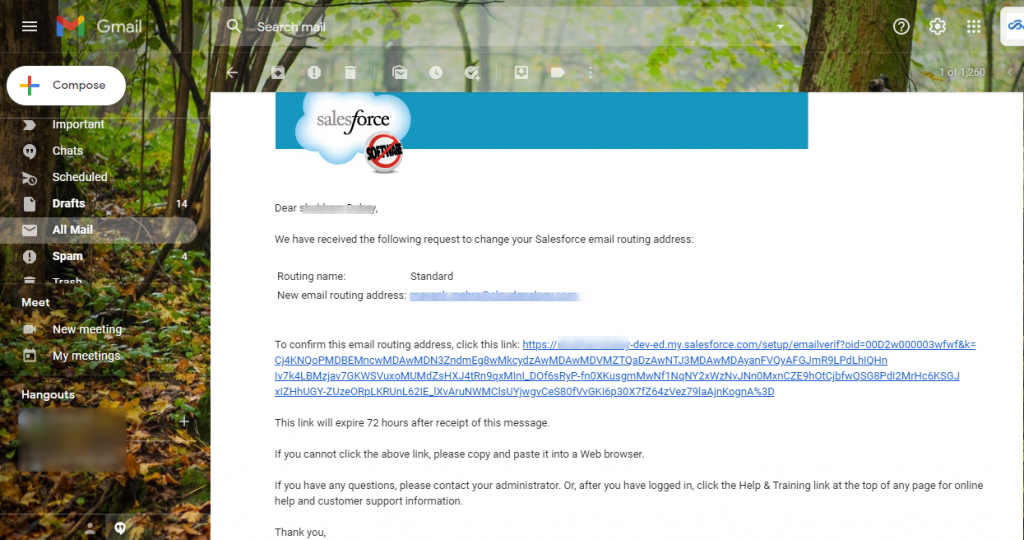
7. Now check an Email Address will be generated to which if an email is sent, Case will be created in the Salesforce Org.
8. Test the email routing address by sending an email to the address and verify that email is converted to the case in Case object with Subject Email to Case or from the Web to Case.
(Note: To create a Case record, one should have an email id mapped onto the Contact form to which Email will be sent.)
Get Access To Top Salesforce Certified Service Cloud Consultants
Cloud Analogy offers end-to-end Salesforce Service Cloud solutions that include implementation, consulting, migration, support, and enhancement to serve your customers more effectively. Our Salesforce Certified Service Cloud consultants are experts in optimizing customer support processes and can help empower your sales teams with relevant and updated customer information to make quick and better decisions. Contact the leading Salesforce Service Cloud Implementation Partner Now!

Deepali Kulshrestha
Salesforce Certified Developer | Delivery Management Head
Deepali, a certified Salesforce Advanced Administrator and Salesforce Developer and CSPO Certified at Cloud Analogy, is a successful name in the industry circles when it comes to the delivery of successful projects with end-to-end testing. Deepali is a globally-renowned industry stalwart when it comes to managing Operations & Delivery Planning in driving Business Performance Management.Hire the best Salesforce Development Company. Choose certified Salesforce Developers from Cloud Analogy now.
