You are currently viewing Code Smarter And Faster With IntelliJ IDE + Jetforcer

Code Smarter And Faster With IntelliJ IDE + Jetforcer

Sharing is caring!


When it comes to Salesforce development and customization, the development team plays a vital role in the world of Salesforce. Salesforce Developers, also known as SFDC Developers, strive to complete Salesforce development projects with their professional development skills and a comprehensive set of tools and technologies at hand.

Every day, Salesforce developers worldwide integrate across systems, presenting data in the right place and at the right time to meet the needs of their customers. Therefore, an IDE (Integrated Development Environment) is a must-have software for every developer to streamline their workflows.

This article is an in-depth overview of JetForcer, a Force.com development plugin using the JetBrains IDE that aims to eliminate the tedious development process and make the job quicker and easier.

What is IDE? 

An integrated development environment (IDE) is defined as a software application that provides computer programmers with a wide range of tools for software development in a single product. IDEs typically include at least one source code editor, build automation tools, and debugger. As a result, we can develop and manage our project code with IDE more efficiently, faster, and more reliably. In addition, we can back up our project files, which can be very useful in case of random upgrades or downgrades. Several IDEs and text editors are available, each with different use cases and language support.

Why IntelliJ?

IntelliJ is the best for Salesforce development because it has powerful integrated tools, support for JavaScript and related technologies, and advanced support for popular frameworks. In addition, IntelliJ provides great IntelliSense tips and tools to ease your development. The plugin makes processing Salesforce queries easy and offers all the tools provided by the standard Salesforce developer console.

What is Jetforcer?

JetForcer is a powerful plug-in for Salesforce development with JetBrains IDE, perfectly equipped for the client (Lightning and Visualforce) and server-side (Apex) development. It syncs seamlessly with IntelliJ’s built-in tools and features and gives us a great ability to develop, manage and update projects. It comes with the best toolkit with error detection, intelligent code completion, robust navigation, and refactoring for Apex, Visualforce, Lightning, SOQL, and other supported technologies.

Steps To Install And Configure IntelliJ And Jetforce

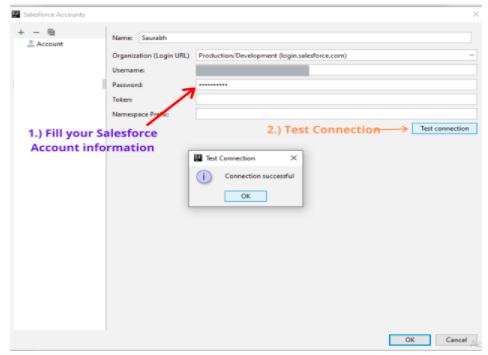
Installing and configuring IntelliJ and Jetforce is a simple process. To get started, you need to download your specific version of IntelliJ Idea from the official website https://www.jetbrains.com/idea/ and install it. Then, configure Salesforce org once in your IDE and use it however you would like.

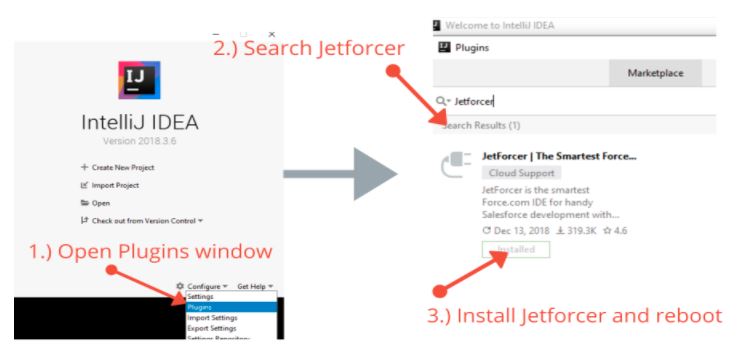
Step 1: Download and Install IntelliJ Idea 

There are generally two editions: Community and Ultimate, both of which have different limitations and uses. Download the version as per your requirement and install it on your computer.

Step 2: Install the Jetforcer plugin.

Now that you have IntelliJ Idea installed, it’s time to set up your IDE to communicate and allow you to manage Salesforce projects easily. First, open the plugins window from Configuration -> Plugins and search for Jetforcer; Once you find it, install your IDE and restart it.

Step 3: Create a new salesforce project

After following the above two steps, you should see Salesforce and SalesforceDX options in the New Project window.

Whenever you want to set up an org, you have to navigate to File -> New Project. 

Click Salesforce, and a window will appear, select Salesforce, and you will see the option to connect to Salesforce account on the right-hand side. 

Step 4: Connect to Salesforce Account

If you don’t have any account pre-installed in your system, you won’t see the account there. To create a new one, click on the pencil or edit icon; it will be at the right-hand side of the options list. The account window will open, and you can create as many accounts as you want.

Enter the details on the right-hand side section of the account and test Connection.

Remember: You need to whitelist your IP Address if there are any IP Restrictions in your org. Once the connection is successful, click on OKbutton.

Step 5: Choose your elements and save the project.

Once the connection is successful, all you have to do is select the elements or modules you want to import/retrieve from your Salesforce to work upon and click on next, then name your project so that you can quickly identify it in the IDE.

Once done, click Save, and your project will be fetched. You may be asked to enter the key for Jetforcer or use it for a trial version for the next 30 days. Once done, you will see all your project files listed in the left side project window.

Steps To Retrieve And Deploy

IntelliJ offers you a fast approach to upload your project in the actual environment and retrieve the project from the source. Furthermore, it gives you the option to choose what to keep in the project when extracting from the source. Thus, you can quickly deploy or download projects with one click and upload or extract files.

Here are the shortcuts to be used:

Retrieve : Ctrl + Alt + r

Deploy : Ctrl + Shift + d

Here are the steps and process of how to retrieve and deploy the code.

Retrieving Project:

For retrieving the project, all you have to do is click on the project name in the Project window.

Then, in Salesforce Menu, select retrieve project.

Choose what you want to keep and hit Retrieve.

Deploying Project:

Follow the same steps as in the Retrieve project to deploy the entire project, but instead of choosing Retrieve in Step 2, we need to click on Deploy Project.

Note: Deploying the entire project is not recommended unless you want to upload your existing project data to a static environment on your local storage. Remember that once a project has been deployed, it cannot be undone. You can upload outdated projects to packages, and any recent changes made by other team members may not be supported in the project.

Steps To Retrieve Files in Project:

Retrieving single file updates that file on the project with the latest version and the last changes made to it. This can be useful when you don’t want to work with the entire project, but only with this one file.

You can extract the files by doing one of the following:

Method 1): Select the file you want to retrieve, Right-click on it, and choose to retrieve.

Method 2): Open the file you want to retrieve, Right-click on it, and choose to retrieve

Method 3): Open the file you want to retrieve, place the cursor anywhere on this file, and hit the shortcut key. 

Ctrl + Alt + R

Steps To Deploy Files in Project:

Deploying a file will update that file in the actual environment with the updates in the file you have uploaded.

These are the most common actions we use when making changes to files and want to reflect them in the real environment; we have to deploy that file unless we cannot see the changes we have made.

You can deploy a single file by doing one of the following:

Method 1): Select the file you want to deploy, right-click on it, and choose to deploy.


Method 2): Open the file you want to deploy, right-click on it, and choose to deploy.

Method 3): Open the file you want to deploy, and put the cursor anywhere in that file, and hit the shortcut key. 

Ctrl + Shift + D

IntelliJ as Standard Developer Console

IntelliJ with the plugin of Jetforcer brings you the same tools and features as the standard developer console of a Salesforce org. It offers a Log Manager as the debug log, Execute Anonymous, and you can run a query with the help of Query Editor in the IDE. You can run our test classes and can see the coverage of the classes. It provides an SFDX window for running Salesforce commands.

Debug Log:

To use a debug log, make sure you have activated the debug log from your org. 

If not, Go to Setup → Debug Log → Activate any user Trace flag.

Execute Anonymous:

Execute Anonymous is a tool that allows you to run scripts synchronously right from the console. Execute Anonymous is often known for running small scripts and testing small chunks of code without creating code instances. This is an environment that allows you to run sections of code at runtime. IntelliJ with Jetforcer lets you use the same tools. To use Execute Anonymous, click on Execute Anonymous, write and run a script. You can also check the logs of the scripts you run via Execute Anonymous.

Query Editor:

With Query editor, you can test your queries directly and check the expected results. In this way, it helps you run requests anonymously and is very useful for making simplified requests. You can easily set up the Query Editor in IntelliJ by following these steps:

First, you need to connect your IntelliJ and the org query manager.

Step 1) Find the Query Editor in the IntelliJ or the Salesforce menu and open settings. Then, create a new connection and fill in the login details and test the connection.

Step 2.) As soon as the connection is confirmed successfully, you can now start the query at any time and view the connection name in the query editor window. Select this connection, right-click the connection name and open the SOQL console.

You can write a query in the SOQL console and run it; output is generated in the DB execution console.

Run Test:

Jetforcer gives you the ability to run your own IntelliJ test classes, and you can check the scope and debug your code using Jetforcer’s built-in tools. Implementing test classes is very easy in IntelliJ. First, open the test class you want to run. A green-colored rub icon appears in front of every function and class in the test class. Right-click the green button right in front of the class name and choose the Run test with coverage.

After a successful test class run, you can check the test class status in the Run window and class code coverage in the Active coverage Suite. 

Backup Project:

Regularly backing up project code is best practice, especially when working with a team. It keeps daily updates of the project and will be helpful in a real environment in case of accidental replacement. Therefore, the project should be backed up every day before starting work, before retrieving the project, and after all updates.

Select the project name you want to back up, Right-click, and copy to create a project backup.

Make sure you create a folder in a safe place to store all the backups related to the project. Then, open that folder and create one more folder to store the backup that you have just copied. Give an identical name to the folder; best practice is to start the folder name with the Date in format MM-DD-YYY and the day’s name. This will help you identify the day and date, and the format will help you sort the project backups.


Once done, open the folder and paste the copied file into that folder. Done, you have just created a backup for your project.

Tips and Tricks

IntelliJ has many features that make writing code very easy and debugging very efficient. However, you can also learn about and discover new tools and commands in IntelliJ that will help you automate the process and provide you with the best tools available. Some of the tips and shortcuts are as follows:

Find:

Ctrl + F, with this, you can find any character or regex in the file.

Replace: 

Ctrl + R, you can replace any character or regex in the file with another character.

Search:

Double Shift, With this, you can search any file in the whole project by finding any keyword.

Find and Replace in Project:

You’ll find each character or regex not only in the file but throughout the project, and you’ll be shown all the occurrences of the character with the project file name and even line numbers.

To do this, Go to Edit Menu → Find → Find in Path, or you can click Ctrl + Shift + F.

From there, choose the location you want to find, and then it will show you all the occurrences as soon as they are done.

You can do the same for the Replace; you have to select Replace in the path if you want to replace occurrence with another character in the whole project.

Quick Comment and Uncomment:

Select that code and press Ctrl + Shift  + /if you want to comment on a code. To uncomment the commented code, select the code and press the same shortcut key.

Quick Navigation:
You can quickly navigate to the location of a parameter or definition by holding the Ctrl key and clicking that parameter. It will navigate you to the references where that parameter is defined or used. You can also do the same for classes, objects, arrays, and others.

Quick Action:

With Ctrl + Shift + A, you can find any action or create your action. This will allow you to find any sort of tool present in your IntelliJ. You can create your live templates and even macros that automate writing code.

Quick Format:

To quickly format the code, click Ctrl + Alt + L, and it will be formatted according to the writing language.

In addition, there are many shortcuts, tips, and tricks that you can use when developing projects with IntelliJ and Jetforcer. Whether you’re looking for a simple, language-specific IDE or a full-featured platform to manage most or all of your development projects, “IntelliJ IDEA is undoubtedly the top-choice IDE for software developers.

IMG-20180211-WA0001 (1)

Somya Tyagi

Project Manager
Somya Tyagi is a highly skilled Project Manager who has successfully delivered hundreds of CRM projects in the last few years. She is a Scrum Master of repute who is passionate about agility and helping companies make the transition from traditional project management/development to agile. Somya is always open to assist other teams in understanding project requirements so that collaboration can happen in the best possible ways in an environment conducive for the business. She is a top-performer and motivator who has the added advantage of technology as leverage to achieve timely results.

Leave a Reply

× How can I help you?