Lightning Web Components (LWC) is a stack of modern lightweight frameworks built on the latest web standards. It is a total game-changer as it supports the latest features and standards. It is a DOM (Document Object Model) component created via reusable code and is used to generate a dynamic interface without using JavaScript or constructing a Library. LWC and Aura Components share the same high-level service and can coexist and interoperate.
In this blog, we will provide you insights on the benefits of LWC, such as –
How to create Lightning Web Component, File Upload Related to Contact in LWC, and Display Upload Files related to contact.
First, let us discuss the benefits of LWC.
Benefits of LWC
1. Load a web page faster.
2. Easy to learn for scripts using HTML and Javascript language
3. It is lightweight and efficient in memory management.
4. Support two-way data binding for coordinating how data moves between components.
5. Support unit testing framework.
6. Full encapsulation is available, which makes it versatile.
7. Inbuilt browser security features.
8. Debugging is much easier for LWC.
Next, let’s have a look at how can we create lightning web component –
How to Create Lightning Web Component?
Step 1: Create ‘AccountRelatedContact’ Lightning Web Component from Visual Studio code. Press Control shift P and type SFDX: Create Lightning Web Component.
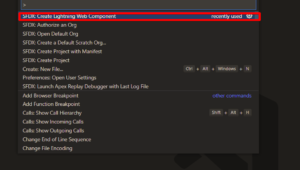

Step 2: Insert the name of the component and click Enter.


Here it will display the accountRelatedToContact lightning web component.


Now, when we get the recordId in the Lightning record page, the record page is used to set the property to the ID of the current record page. In the JavaScript class of the component, use the @api decorator to create a public recordId property.
To get the current record id in the lightning component (aura component), we had to implement force:hasRecordId. But in the lightning component, it’s straightforward, and we only need to use the recordId property with @api decorator. RecordId can be used to query Account records or some other details related to contact.
Next, we can add the LWC component to the account detail page with the following steps:
- Go to the Account tab.
- Open any record of the account.
- Click Setup (Gear icon)and then click Edit Page.
- Find Custom Components, select your AccountRelatedContact component and drag it on the right-hand side top.
- Click Save and then activate.
We will have the following output.


File Upload Related to Contact in Lightning Web Component(LWC)
The lightning-file-upload component provides an easy and integrated way for users to upload multiple files. The file uploader includes drag-and-drop functionality and filtering by accepting file types.
File uploads are always associated with a record, so the record-id attribute is required. All uploaded files are available in Files Tab Home under the Owned by Me filter and on the record’s Attachments-related list on the record detail page. You can restrict the file formats using the accept attribute. Although all file formats supported by Salesforce are allowed, so you can upload multiple files in multiple formats.
Lightning-file-upload base component is with the following attributes:
- Label: Label for the Upload Files button.
- Name Name of the component.
- Accept: To restrict the File Types. Only Files Types provided in the list are supported for uploading(pdf, jpg, png).
- Record-id: To relate uploaded files to a particular record.
- onuploadfinished: This method will be called once the file is uploaded succeMultiple
- Multiple: To upload multiple files.
- Iterate through the list of files in an array that will contain the list of all the uploaded files.
In JS Controller, record-id is the Id of the contact that is passed to the lightning-file-upload. accepted formats, Getter ( They are JavaScript functions and are more powerful than expressions and are used to calculate the value of a property) returns the list of File Types that will be allowed to upload. A method in Java is used to access and manipulate the values of class fields. handleUploadFinished() method will be called when the files are uploaded successfully. We will get the uploaded files’ names and add them to the array. This array is used in the component to display the uploaded files name, file type, and size.
- When clicking on the upload icon button, a modal is displayed for file upload.
- Click on the Upload File button below and successfully upload the files.
We will have the following output for uploading files.


A modal will be displayed when uploading a file successfully. Then it will show the File Name and file type, and delete the file options.
If you want to delete the file, click the Delete action, or for saving the file click the Save button. The file will be saved in the contact record.
We will use the following output for uploading files.


Display Upload File Related to Contact
On the Detail page, an account related to the contact is displayed. Here is a file related to contact which will Display File Name, created Date, and File Type. If you need to upload multiple files, then it will show various files related to contact.


Conclusion
Lightning Web Components (LWC) is an absolute game changer as it offers an interface, modern and richer and one of its salient features is flexibility. This flexibility helps to meet the customer needs on an individual basis.
In this blog, we have displayed a data table of Contacts on an Account Record Page and used the modal component as a file uploader by clicking the upload file button. Basically, you need to select a contact and then click the modal button, and then upload files/files to the selected contact. Display a data table of files in modal If you want to delete a file then click the Delete action. If you want to save the file then click the save button. Display contact related to the account and also related to files.
Here is another built-in LWC on Supporting Sites.
Cloud Analogy is one of the top certified Salesforce Consulting Companies that can offer you valuable advice on implementing LWC using VS Code and will assist you as your trusted Salesforce Implementation Consultant. We offer cost-efficient Salesforce Implementation Services to succeed you with the best solutions. Reach out to our expert and certified team at Cloud Analogy and start your project today.