Conga Composer is a document generation tool that is simple to use and over that Conga Composer makes it straightforward to create and deliver refined documents, shows, and reports from Salesforce by mechanically populating richly-formatted templates with information from any standard or custom object.
It is a third-party and one of the most effective commerce apps on the Salesforce marketplace AppExchange. Conga Composer permits Salesforce users to make, customize, automate and generate documents and quotes with a single click of a button. It can even choose richly-formatted templates with information from any object type in Salesforce. We will produce Conga templates through template builder. Conga Composer can be termed as a Digital Documents Pillar due to the following:
- Visualize your data and create your document.
- Next, send your document for eSignature.
- Automation with Batch, Trigger & Orchestrate.
- Hands-On: Build a Composer solution.
In this post, we will delve into the steps for installing Conga Composer with Salesforce and how to Implement Conga Composer with Salesforce.
Steps For The Installation Of Conga Composer With Salesforce
Step 1: Log in to Salesforce with the credentials of an Administrator.
Step 2: Click the Salesforce App Launcher grid and click on the View All link.
Step 3: Click the AppExchange button in the upper-right of the App Launcher screen.
Step 4: Type Conga Composer for Salesforce in the AppExchange search field.
Step 5: Click the tile for Conga Composer for Salesforce. The app installer page opens.
Step 6: Click the Get it Now button.


Step 7: Click the Open Login Screen button.
Step 8: One of two options appears:
- If you have logged into the AppExchange already: Click the Allow button in the Allow Access modal.
- If not logged into the App Exchange: Log in to the Salesforce Appexchange using Salesforce Production credentials from an Administrator user. Click the Allow button.
Note: Production administrator credentials are needed at this step to authenticate to the App Exchange, even if installed in a Sandbox.
Step 9: Click the Install Here button under the Install in This Org header.
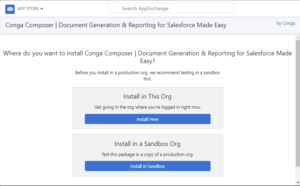

Note: Optional: Click the Install in Sandbox button to test first.
Step 10: Check the box for I have read and agree to the terms and conditions.
Step 11: Click the Confirm and Install button at the bottom of the page.
Step 12: Click the Install for All Users radio button.
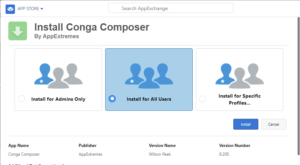

Note: The app may need to be uninstalled and reinstalled for “All Users” later if you select the “Admins Only” or “Specific Profiles” options when installing the app.
Step 13: Click the Install button. A modal opens with a list of third-party websites.
Step 14: Check the box for Yes, grant access to these third-party websites.


Step 15: Click the Continue button.
Step 16: Click the Done button when a message notifies: This app takes a long time to install.
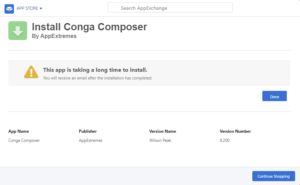

Note: You will receive an email notifying you that the installation is complete.
Steps For Conga Composer Implementation With Salesforce
Steps to use Conga Composer:
Step 1: You must create a Conga Composer button or link.
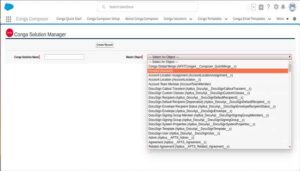
(1) Open Conga Composer, go to Conga Solution, click on the new Name of the conga solution and use Master Object wherever you wish to use this solution.

(2) Click on Create a Button, which will create a button that can be used in page layout.
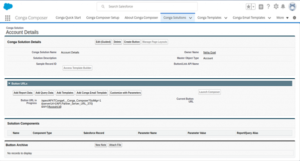

3. Then navigate to that object’s button, Link, and Action tab, and find out the button created automatically by Conga Composer.


4. Now we go to the page layout and select the layout where we want to use the button, then go to the button, select the button you just created, and drop it into a Page Layout.


Step 2: Now, let’s start to build a template.
- Go to the object’s detail page and select the button that you just created; it will redirect you to the URL where you can access Conga Composer.

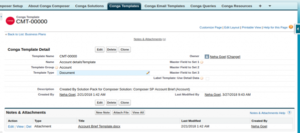
- Now click on the tool and setting and then template builder and use the notation needed in our local template, copy that and paste that into the template for use, and save the file.


Step 3: Generate output documents.
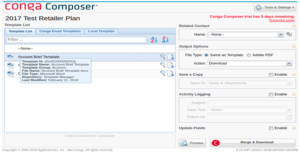
- After building templates, go to the Conga Composer generator and select the template you created and saved locally.

- We can now use our document with the same template or a PDF.

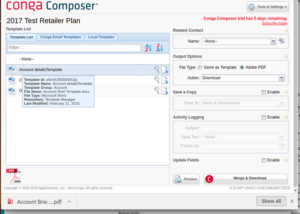
Step 4: We can preview it and download it.
Finally, you have generated a document with a button click for a single record.
Conclusion
Conga Composer is a simple-to-use document generation tool. It is the most popular application used for document generation and reporting solutions in Salesforce. Its popularity is due to its affordability and valuable features for rendering the Salesforce experience. It helps you not only to generate the document but enables you to create and automate the document. If you wish to create pixel-perfect, rich documents in Salesforce, including invoices, contracts, and quotes, then Conga Composer is the right tool to get started. Want to know how to get started with Conga Composer to get the maximum value out of it? Cloud Analogy, a top-notch, Certified Salesforce Consulting company, will guide you on the benefits of using Conga Composer in Salesforce and increase your business bottom line. We deliver cost-effective Salesforce Consulting services that align perfectly with your business requirements. Reach out to our expert and certified team at Cloud Analogy and start your project today.