Introduction
Sending and receiving data through HTTPS queries is quite effortless when integrating REST APIs with external apps. Now, users can insert a list of contacts after authenticating with Salesforce org.
First, we need to generate the access_token of Salesforce org. We are using OAuth 2.0 authentication for an access token.
After getting the access token, users can use the Webservice by providing a list of contact records in the request body (JSON format).
In the header, fill the Authorization key with the correct Bearer token obtained from the earlier Authentication process.
This post will help you to insert contacts into Salesforce org through the REST API. It includes the Authentication process and creating contact through Webservice.
First, we will explain what needs to be done to insert contacts into Salesforce org.
How to Insert Contacts in Salesforce Org?
So to insert contacts in Salesforce Org, we need to do the following:-
1:- Authentication Process.
2:- Create Contact Through Webservice.
Part 1:- Authentication Process
Step 1 – Create a Connected App in your Org.
Let’s first understand what a Salesforce Connected App is.
“Connected App” is an application that helps to connect Salesforce org with an external application. OAuth protocols are used by it to authenticate and provide tokens to be used with Salesforce APIs.
Now, let’s look at the Connected App’s creation process.
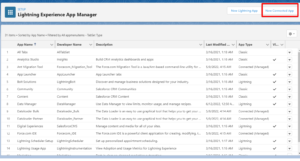
- First, Go to Setup->Apps->App Manager
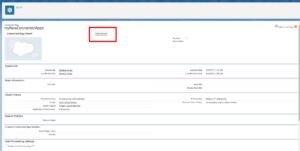
- Click on the ‘New Connected App’ Button that is in the “Connected App” section. The below screen will be shown:

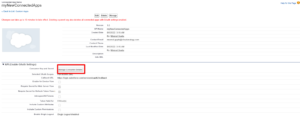
- Enter the Name of the Application and then Enter the Email Address of the Contact and any required information for your application.
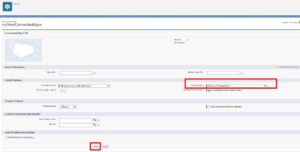
- Enable the OAuth settings in the API section to configure the connected app’s OAuth settings.
- Enter a Callback URL. A callback URL is a URL to which a user’s browser is redirected after successful authentication of the connected app. Here I’m giving you the call URL as “https://login.salesforce.com/services/oauth2/callback”. You can enter multiple callback URLs, but you have to ensure that the callback URL is secured, and in case of using multiple URLs, they should be separated by line breaks.
- Next, Add Selected OAuth Scopes. OAuth scopes define permissions for the connected app, which are granted as tokens after the app is authorized. Now, here I’m giving “Full access(full)”.
- Click on the ‘Save’ button.


- Click on ‘Continue’
- It will redirect you to your Connected App’s Page

Once the Connected App is created, do the following:
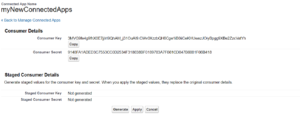
- Click on Manage Consumer Details.
- After that, you will receive an OTP in the Mail for verification.
- Make sure to take note of “Consumer Key “ and “Consumer secret”. These details are required to authenticate the external application.

- Next, click on Cancel and Click Manage.
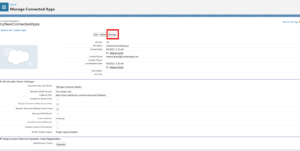

- Then click on Edit policies.
- Click on IP Relaxation and select Relax IP Restrictions, and Click Save.

After completing this step, we will see how to call and integrate Salesforce.
Step 2:- Authorize the org through Postman.
Authentication is done to get the Access token.
Request Method: POST
| API | https://login.salesforce.com/services/oauth2/token?grant_type=password& |
| Params | grant_type: password |
| Header | Content-Type: application/JSON |
To get an Access token, we need the following:
Body :
| client_id | 3MVG9sh10GGnD4Dsj7H7IPygEnB7YW1ajIsj0RFkG0rFI7mFSG90yIStwii 42pbJQVdgw4JBJfNGJR.5A09iT |
| client_secret | BF59FE4CE9FA01934F96D550A07CDF84C23DBF03D09A148EC3DB423 F341B1E8F |
| username | Your username |
| password | Your Password |
Access Token is received in this format:-
{
“access_token”: “00D5g000004SWR6!AQ0AQCQ0ukCMi1eJhZHk_mWixsZiReEomT42wLVRMg.X85WlsJptswTX1ydeD2quANidSoSpacehHeAuqn7II.QVDirTY.FD”,
“instance_url”: “https://cloudanalogy268-dev-ed.my.salesforce.com”,
“id”: “https://login.salesforce.com/id/00D5g000004SWR6EAO/0055g000005izwWAAQ”,
“token_type”: “Bearer”,
“issued_at”: “1644823043011”,
“signature”: “tyQKD18Zv3oQb24+vJ/4+7DzND+Jo8Pi77yYZWF4Rf0=”
}
After getting Access Token, we will create a web service for creating a contact.
Now, we come to create contact with Web Service.
Part 2:- Create Contact through Web Service
Step 1:- Create an Apex Class
@RestResource(urlMapping = ‘/createContact’)
global without sharing class ContactInsertedThroughRestAPI{
@HttpPost
global static void doGetContactRecord() {
system.debug(‘in method’);
RestRequest req = RestContext.request;
String body = req.requestBody.toString();
List conList = new List();
conList = (List) JSON.deserialize(body, List.class);
system.debug(‘conList’+conList);
RestContext.response.addHeader(‘Content-Type’, ‘application/json’);
RestContext.response.responseBody = Blob.valueOf(‘Contact Inserted’);
insert conList;
}
}
Step 2:- Create a Webservice through Postman
Sample request for getting Contact List: Request Method: POST
| API | https://cloudanalogy268-dev-ed.my.salesforce.com//services/apexrest/createContact |
| Authorization | Bearer |
We need to send the contact details in the format given below. You can insert single or multiple records in a single API call, but records not exceeding more than 1000 at one time. For inserting contact details, lastName and email are the required fields. Otherwise, you will get an error message.
Sample Request Body to send with a request:
[{“IsDeleted”: false,
“LastName”: “Evans”,
“FirstName”: “Karl”,
“Name”: “Karl Evans”,
“OtherStreet”: “”,
“OtherCity”: “”,
“OtherCountry”: “”,
“OtherGeocodeAccuracy”: “”,
“OtherLatitude”: “”,
“OtherLongitude”: “”,
“OtherPhone”: “”,
“OtherPostalCode”: “”,
“Otherstate”: “”,
“MailingCity”: “”,
“MailingCountry”: “”,
“MailingGeocodeAccuracy”: “”,
“MailingLatitude”: “”,
“MailingLongitude”: “”,
“MailingPostalCode”: “”,
“MailingState”: “”,
“MailingStreet”: “”,
“Email”: “Karl.Evans@gmail.com”,
“CurrencyIsoCode”: “GBP”,
“HasOptedOutOfEmail”: false,
“HasOptedOutOfFax”: false,
“DoNotCall”: false,
“CleanStatus”: “Pending”}]
Example response of above call :
Contact inserted
Conclusion
Following the appropriate steps will allow you to insert contacts or create contacts using REST API. It is easy to integrate contact management into different applications and platforms using REST APIs, a standard protocol for communication between different systems.
In general, REST APIs facilitate the management of contacts and the integration of contact management into various applications and systems. The REST API makes it easy for developers and businesses to streamline contact management processes by following best practices and guidelines.
Do you want to insert/create contacts through REST API effortlessly and easily? Looking for one of the top Salesforce consulting firms around you?
Then look no further than Cloud Analogy. The competent professionals at Cloud Analogy, one of the top Salesforce Consulting companies, will guide you with valuable suggestions.
We offer cost-efficient Salesforce Consulting services to grow your business in various ways and act as your trusted Salesforce consulting partner.
Feel free to reach out to us to fulfill your REST API related business needs.