Sharing is caring!
Salesforce, the world’s leading CRM software, offers you a wide range of tools to help you automate your repetitive and time-consuming business processes. Automation tools are known as the declarative tools in Salesforce that come with many benefits to help technical experts and organizational leaders replace manual and repetitive tasks with automation to accelerate your business growth.
Here, the question arises: With the several automation tools available in the market, making the right choice may not be so straightforward. Here is the detailed comparison of Workflow vs. Process builder that will help evaluate both Process Builder or Apex triggers and decide which is the best-fitting automation tool for your business.
Introduction To Process Builder In Salesforce
Salesforce Process Builder is one of the most powerful, automated tools that enables you to automate your business processes by updating or creating a record to improve productivity, save time, and reduce human errors.
Process Builder in Salesforce is a point-and-click tool that allows you to automate if/then business processes using a graphical representation of your process. Every process contains a trigger, at least one criteria node, and at least one action. You have the ability to configure immediate actions or schedule actions to be executed at a specific time. Salesforce Process Builder empowers you to have multiple workflows with their corresponding actions and enables you to set the exact evaluation order. Moreover, it allows you to Post to Chatter and Submit for Approval.
Actions Associated With Process Builder
1. Creating Records: You can create a replacement record and different field values for a record in the way you like.
2. Updating records: You can update the record using manually entered values or with the values from related records.
3. Create Chatter Post: Process Builder enables you to Push a chatter update into Group or Feed.
4. Fast actions: Create a record and update a record or log a call with an object-specific or global action that is being created for your organization.
5. Trigger a flow: With flow trigger, you can launch a flow from workflow rules to automate complex business processes.
6. Submit for approval: With Process Builder, you can automatically submit a record for approval.
7. Call an Apex Class: You can call an Apex class within Salesforce as per your requirements.
8. Invoking another process: This action allows you to call another process to a different process.
Best Practices For Salesforce Process Builder
- Avoid overlapping automation on one object completely.
- Utilize the outline field to populate information such as when the method was created, whom, and what the method does. Also, you need to mention if processes add conjunction with one another.
Note:- If you are using it the first time, start by using the sandbox first.
- Verify no active Apex trigger restricts the actions during a process so that no workflow on the item does similar things.
Create A Process Builder In Salesforce
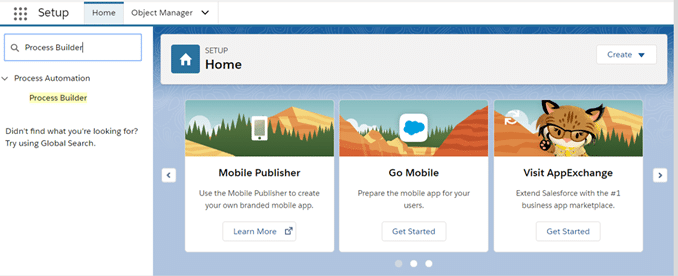
Step 1: To create a Process Builder, move to Setup. In the Quick Find box, type “process.” Then select Process Builder under the Process Automation section.
Step 2: You will be landed on the Process Builder Home screen. Then, click on new to create a brand new Process Builder

Step 3: In this step, a pop-up will appear for you to create your new process. This is where you need to give your process a name, add a description if you would like, and choose what trigger will start your process.

From the computer menu, select record changes and then click on Save Button.

Step 4: Then, you will see a Process Builder flow chart, and this is where you build your process.

Step 5: In this flowchart, you’ll see Add Object. After clicking on that, you’ll see a form on the right-hand side. Select the item name as Opportunity and choose the option to start the method when a record is formed or edited (you can select any in step with your requirement ), and then click on Save Button.

Step 6: Next, you’ll see the Add Criteria option. Choose criteria for executing actions, then set the conditions and any logic for the conditions.
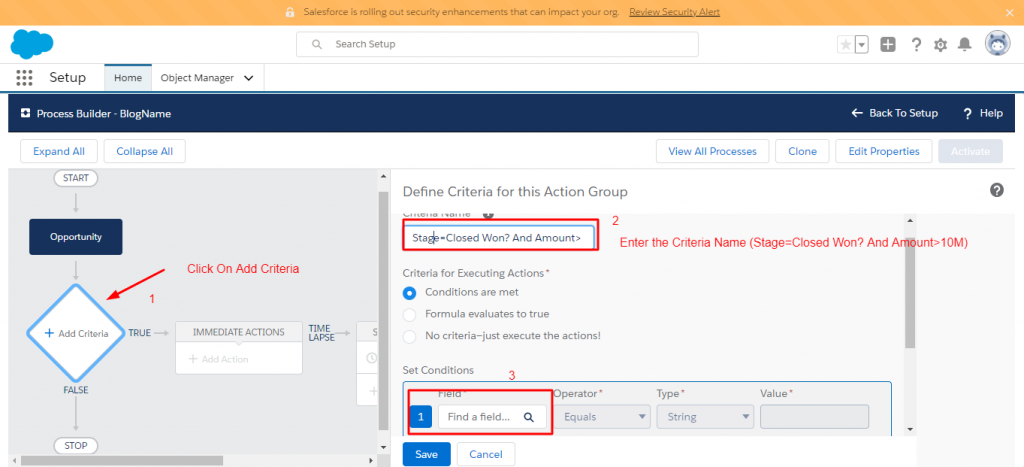
Here, you’ll need to select the sphere as Opportunity > Stage (again, you’ll have the option to choose any) and click on the Choose button.

Next, you have to add an Operator. Here, consider this as Equals. capable of the record, within the dropbox, and choose Picklist Value as Closed Won.

After that, you will be provided with another feature row, and you have to perform similar actions as shown within the image below. After that, click on Save Button.

Step 7: In this step, you need to add your action(s) in line with the criteria met. To do that, click on Immediate Actions. And then, after you see the shape on the right-hand side, fill up the following:

Note: Remember to activate the method by clicking on the Activate button.

Limitation of Process Builder
- Process API Name must be different across all processes and flows in an organization.
- Processes don’t trigger the Validation rule, so that it might invalidate data. If any one fails, the overall process will fail, and a slip-up is displayed.
- Actions are executed within the order as per the method builder, and you also can change it.
- There’s no help function to preview next to the syntax while utilizing the formula in criteria.
- Process Builders cannot handle DML. It only executes after a record has been created or updated.
- Users can’t edit the method once it’s been activated. It is similar to the flow; a new process has to be created by cloning the initial process and making a few modifications to its cloned records.
Introduction To Apex Trigger
A trigger is an Apex script that gets executed before or after data manipulation language (DML) events occur. Triggers are active when created by default. Salesforce automatically fires active triggers when the required database events occur.
A trigger in Salesforce is an Apex code that is used to perform an operation before or after a record is operated. These operations include:

Types Of Apex Triggers
Before triggers:– These triggers are used to perform a task before a record is inserted or updated or deleted. They are used to update or validate record values before they’re saved to the database.
After triggers:– These triggers are used to access values of the record stored in an exceedingly database and use this value to create changes to other records. After trigger records are in read-only format.
Trigger Syntax
trigger TriggerName on ObjectName (trigger_events) {
code_block
}
Let us now take a closer look at the keywords used in the syntax:
TriggerName: It defines the name you would like to present to your trigger.
ObjectName: It is the object on which the action is performed.
trigger_events are the list of one or more events that include:
1. Before insert: Code Block needs to be executed for replacement record to be inserted
2. Before update: The code will get executed before a replacement record is updated within the object.
3. Before delete: Execution of code block will be performed after the record gets deleted.
4. After insert: Insertion of records will be after Code Block gets executed.
5. After update: Record will be updated after the code block is executed.
6. After delete: Delete a record after the code block is executed.
7. After undelete: This event is employed on those Recycle Bin records that you wish to restore.
Best Practices Of Apex Trigger
- Apex code must provide exception handling.
- When query a large data set, use a SOQL FOR loop:
- Don’t use SOSL and SOQL inside the loop.
- Don’t use Hard Coding IDs within the code.
- Write Bulky Trigger(By default, all triggers in Salesforce are bulky triggers. this implies you will be ready to process many records simultaneously)
Salesforce Trigger Example:-
Scenario: On Account to make a ‘Default’ (number of contacts= numbers of the employee) contact on every occasion an account is formed.
trigger NumOfEmployeesFromAcc on Account (after insert) {
if(Trigger.isInsert && Trigger.isAfter){
InsertContactsFromEmployees.afterInsertEvent(Trigger.new);
}
}
Apex Class
public class InsertContactsFromEmployees {
public static void afterInsertEvent(List accountList){
List contactList = new List();
for( Account accObj : accountList )
{
integer NumOfEmp = 0;
NumOfEmp = accObj.NumberOfEmployees;
if(NumOfEmp > 0){
for(integer i=0;i<numOfEmp;i++)
{
Contact contactObj = new Contact();
contactObj.AccountId = accObj.Id;
contactObj.LastName=’Contact Last’ + i;
contactList.add(contactObj);
}
}
}
insert contactList;
}
}
Introduction To Bulkifying Trigger
Bulkifying Trigger is used to handle a single record and thousands of records. There are two most important point for bulkifying trigger that needs to be considered:
- Write triggers that operate on collections of sObjects.
- Write triggers that perform SOQL and DML operations effectively.
Note: If you don’t follow the above points, you may hit the governor limit when records are created/updated/deleted in mass using a data loader or other tool.
Limitations of Apex Triggers
- Foreign Key actions cannot activate triggers.
- As triggers don’t return any values; hence the RETURN statement isn’t permitted.
- We cannot use the decision statement in triggers..
- We cannot use the choice statement in triggers.
- If a trigger is loaded into cache, it does not get automatically reloaded when the table metadata changes. In this case, a trigger can operate using outdated metadata.
- We cannot create a view for a short-lived table or a view.
Conclusion
Salesforce Automation tools functionalities offer a personalized and consistent user experience for your customers and let you perform tasks only when a complex set of criteria are met. Process Builder in Salesforce is a point-and-click tool designed to setup immediate and time-based action. Its robust design enables you to build and customize the automated your org’s business processes. It will let you automate various aspects of your business process to prevent errors, save valuable time, and reduce costs.
On the other side, Apex triggers in Salesforce allow you to perform custom actions before or after changes made to Salesforce records, including insertions, updates, or deletions. A trigger is Apex code that executes before or after the following types of operations: insert, update, modify, or delete.
Are you interested in learning more about Process Builder and Apex Trigger? Get in touch with Cloud Analogy Salesforce experts to learn everything you need to know about Process Builder and Apex Trigger to automate and supercharge your business process management to increase productivity.

Nitish Bhardwaj
Salesforce Principal Consultant | Chief Information Officer
An experienced Salesforce.com professional with 5+ years of experience in consulting on and delivering Salesforce projects for mid size, large and very large customers.Hire the best Salesforce Implementation Partner. Choose certified Salesforce Implementation Experts from Cloud Analogy now.


