You must have come up with the terms Jira and HubSpot many times. With Jira and HubSpot integration, your support team can solve customer issues faster.
The integration between Jira and HubSpot will enable you to create Jira issues from HubSpot support tickets or find attachments or search and attach an existing Jira issue to a new support ticket in HubSpot. HubSpot automatically updates when the Jira issue status changes.
Moreover, comments on Jira issues can sync directly to the ticket record. So, your team spends less time switching between the two systems and devotes more time to customer interactions.
Many businesses, such as Cloud Analogy, help their clients with HubSpot Integration, providing HubSpot CRM Implementation Solution and more!
In this blog, we will provide insights on what Jira is, why we integrate HubSpot and Jira, steps to install the integration, create and manage Jira Issues, remove a Jira from a record, automate and report on Tickets and Jira issues, sync Ticket Notes and Comments to a Jira Issue, and create Jira Tickets using Workflows.
What is Jira?
Jira Software forms a part of a family of products designed to cater to teams of all types to manage work. Jira was designed originally to track bugs and issues. But now, Jira has evolved into a vital work management tool for all use cases, from requirements and test case operations to agile software development.
Why Integrate HubSpot and Jira?
The integration between these two tools can do great things like:
- Integrate HubSpot Service Hub ticket with Jira.
- Make Jira issues visible to all teams.
- Create Automated Reports of tickets and issues.
Steps to Install the HubSpot and Jira Integration
- Click the Marketplace icon in your HubSpot account, and then select App Marketplace.
- Search Jira integration in the Global Search box.
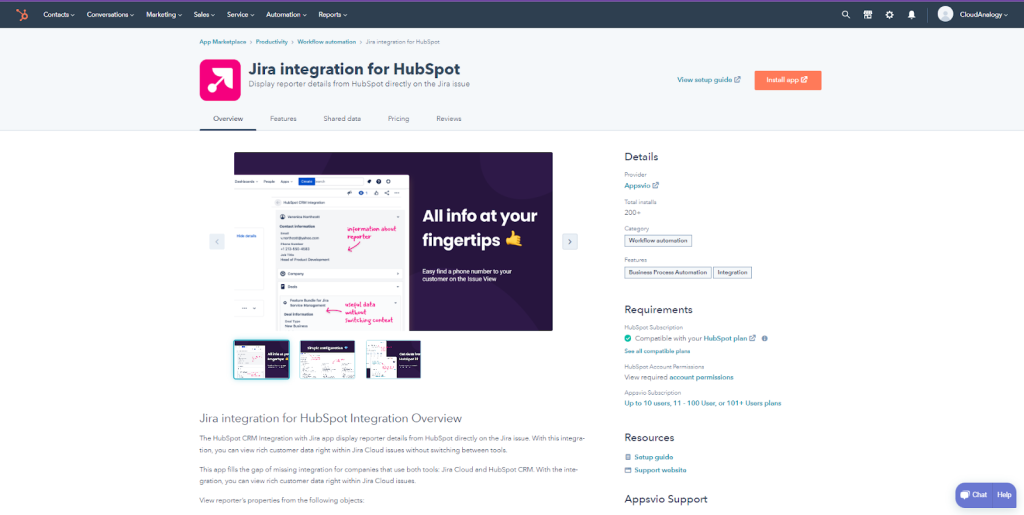
- Click the Install app in the right corner.
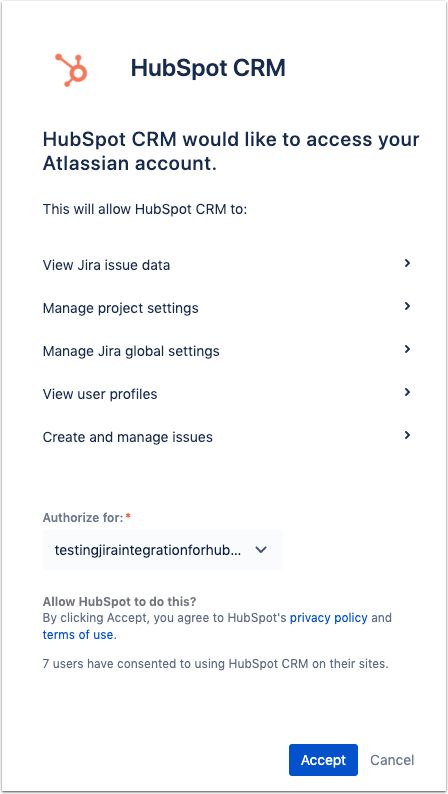
- Click on Accept Button to accept the required permissions
Once the integration is connected, you can produce a new Jira issue from a ticket record, get an existing Jira issue to attach to a ticket, and automate and report on tickets using the workflows tool.
Create and Manage Jira Issues
- In the HubSpot account, Click on Services > Tickets.
- Click the name of a ticket.
- In the Jira section, click Associate Jira issue in the right panel.
- Select an existing Jira issue from the dropdown menu or click Create new Jira issue to create a new Jira issue. However, when creating a new Jira issue, enter the details for the Jira and add any applicable attachments.
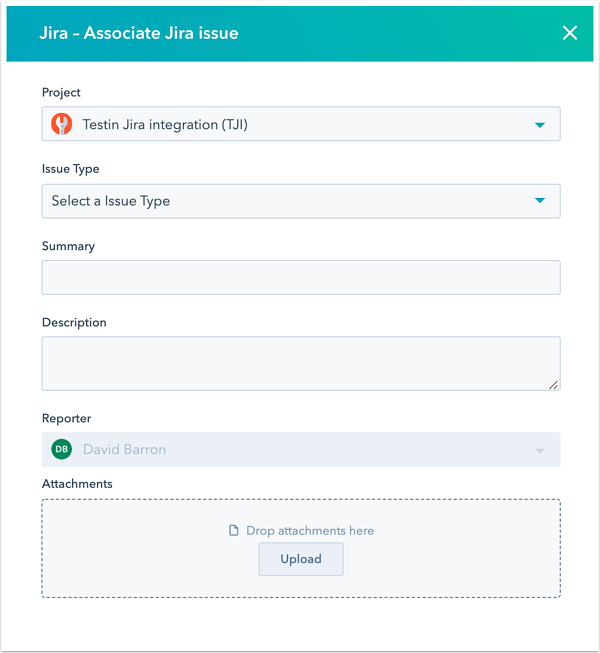
- Then click Attach Jira issue if you have selected an existing Jira issue, or click Create Jira issue if you have created a new Jira issue.
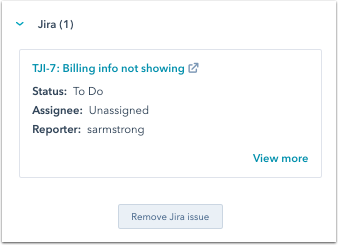
- Now, the Jira issue will appear in the Jira section on the associated ticket, contact, and company records.
- If you want to view comments from the associated Jira issue on the ticket timeline, then in the middle panel, in the Activity tab, click the Filter activity dropdown menu.
- Next, in the Integrations section, select the Jira checkbox. Now, comments from Jira will sync and display on the ticket timeline.
Remove a Jira from a Record
You can remove a Jira issue from its associated record. When a Jira issue is made or associated with a Contact or Company record, an associated ticket will automatically be generated in HubSpot. The Jira is related to the new ticket and the Contact and/or Company record.
- Navigate to Service > Tickets in your HubSpot account.
- Next, click the name of the Ticket with an associated Jira issue.
- Then navigate to the Jira section.
- Choose Actions > Remove Jira issue if you want to remove one Jira issue.
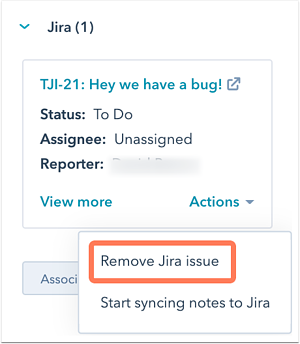
- Otherwise, to remove all associated Jira issues from the Ticket, click Actions > Remove all Jira issues.

Automate and Report on Tickets and Jira Issues
When Jira issues are streamlined and resolved, you can send notifications to your team members or clients. You can also build custom reports to scrutinize your tickets to view which Jira issues have the highest number of HubSpot tickets attached.
In your Jira account, the following properties are available for use in workflows and reports when the Jira integration is connected:
- Jira Issue Status
- Jira Issue Summary
- Jira Issue ID
- Jira Issue Priority
- Jira Issue Assignee
- Jira Issue Identifier
- Jira Issue Link
- Jira Issue Reporter
Note: it is impossible to edit Jira-related property values in HubSpot.
Sync Ticket Notes and Comments to a Jira Issue
The integration automates the synchronization of note and comment information between HubSpot ticket records and Jira tickets. These comments sync bidirectionally between HubSpot and Jira.
- Navigate to Service > Tickets in your HubSpot account.
- Click the name of a Ticket.
- Then navigate to the Jira section.
- Click the Associate Jira issue.
- Select Jira issue from the dropdown menu in the dialog box. Check the box next to Sync ticket notes and comments to this Jira issue. Then click Attach Jira issue.

- In order to sync notes and comments to Jira issues attached to tickets, click Actions > Start syncing notes and comments to Jira.

Create Jira Tickets Using Workflows
In ticket-based workflows, you can add a Create Jira issue action to produce Jira issues from HubSpot automatically. It allows you to set a project, a type, a summary, and a description for an issue.
To add a Create Jira issue action to a workflow, do the following:
- Navigate to Automation > Workflows in your HubSpot account.
- Then click the name of a workflow, or create a new workflow.
- Next, in the workflow editor, click the plus icon + to add a workflow action.
- Then in the right sidebar, select Create Jira issue.

- It is time to set up the details for the Jira issues you’ll be creating.
- Jira’s projects and types will now be automatically imported into HubSpot.
- Next, you can insert ticket tokens into the Summary and Description fields to pull details directly from your enrolled tickets. As an example, you could automatically include the HubSpot ticket status in the Jira description by adding the Ticket status token.

- Now that you’re done setting up the ticket details click Save.
Conclusion
Jira and HubSpot integration enables your support team to solve customer issues faster.
Your team can achieve extraordinary outcomes like integrating HubSpot Service Hub tickets with Jira, making Jira issues visible to all teams and creating Automated Reports of tickets and issues.
Want to devote more time to customer interactions and less on switching between two systems? Cloud Analogy, one of the leading Salesforce integration partners, can guide you on Hubspot Integration with Jira for faster resolution of client issues. We assure you with world-class Salesforce integration services, HubsPot CRM implementation and much more transforming your business and growing your revenue like never before. Reach out to the Cloud Analogy team and start your project today.